Total Pageviews

Sunday 24 November 2013

Busy Busy Busy

So little time, so much to do.
Slowly improving with the spindolyn although the long draw remains a failure. Pinchand pull works a treat.
I've been experimenting with my yarn. Found a nice colour combination. Take black roving and sort of spread it out. Add a few strips of another colour but only a few. When you spin it you get little glints of colour in the black and it's quite effective.
I've been making chunky as well.
That's a bit tricky in the plying stage. See the photos.
From the bottom up:- Roving being prepared for spinning. Black yarn with a hint of colour. Knitting from the chunky black yarn.

The black with a hint of colour yarn on the spindle

Making chunky soft yarn involves plying 2 spun yarns with a strip of unspun roving. The resultant yarn is uneven and chunky and good for chunky mittens.

Sunday 17 November 2013

Good News

If you, like me, have looked at the prices of wool combs and almost fainted, there is a cheaper way.
I posted about using plastic combs last time, but if you want a proper comb with metal nails etc, try looking for equipment for re-enaction.

I picked up a set of replica Saxon/viking (well the design is pretty much the same for all cultures) for £30 on Ebay.
Here they are:

 They work a treat. Just as good as the more expensive modern ones with curved nails.


The yarn on the spindolyn has been spun from wool that I combed with those combs.

Wednesday 13 November 2013

The Long Draw

Sooner or later if using a drop spindle you will encounter something that is called the long draw. You know those videos where the spinner has one hand on the spindle and one hand on the wool and the thread seems to pull itself out of the wool without any assistance from the spinner? That is the long draw.


I even found instructions for it. Apparently you take your rolag, give it a bit of a twist, start spinning and then pull the wool away from the spindle and it pulls itself out of the rolag in your hand.

Like *** it does!!!

I finally received my Spindolyn a few weeks ago. A spindolyn is a modern take on the supported spindle. It's like a kebab skewer with a whorl and it sits in a thin tube. You spin it in the tube and it can't drop to the floor (unless you knock it over.) The idea is patented by the manufacturer, by the way, so don't go rushing off to make your own.

I was going to add a photo but Blogger is having trouble uploading it. Will try again later.
Anyhow.

The recommended method for the spindolyn is the long draw.

Oh


Dear!

Well on the positive side I have got further with it than I have with any drop spindle. Unfortunately I have totally failed to produce useable thread this way. I recommend sticking with pinch and pull unless and until you find someone to show you personally how to do the long draw.
The theory is that if you get the spin just right it will wind the fibres at the same rate that you are pulling the wool back and that pulls the yarn from the wool.

My experience is that it produces a much thinner and weaker yarn. I find that the yarn constantly breaks while I try to wind it ready for plying. 
I wonder if this is the reason why there was a time when it was illegal to sell wool made with a spinning wheel? The long draw is used on wheels.
No, yes, I know that I  may get better at it with time and practice, but as I would like to actually be able to USE the yarn I spin, I have had to revert to pinch and pull even with the Spindolyn. The yarn is thicker but it's stronger.
Spindolyn
At last! It uploaded.


Sunday 3 November 2013

Apologies for long gap but I've been somewhat busy lately.
However, off we go.

Over last few weeks I have been experimenting with brushing and combing wool without having the proper tools to do it.
Here are the 2 methods that seem to wook best for me.
1, Cat slicker brushes.

These are too small to be used the same way as full sized carding brushes but I found a workaround.
Using wool that has been fairly well washed, place one end of the lock between the two brushes. Holding brushes stead, pull wool out. Repeat. Then turn the lock around in your hand and do the other side.

Here's the result.

You can lay the brushed locks together and either roll into a rolag or stretch out into a kind of roving. (The rovings on the right are not produced by this method. See the next method.)

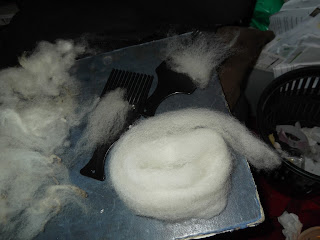
2, Two cheap plastic hair combs from Wilkinson.
Use the combs exactly as you would proper wool combs. (You'll find videos on you tube.) Do small amounts at a time, eg 2 locks. When you have combed through at least twice, grab the end of the tuft on the comb and tug out gently (remember they are just plastic) and draft the combed wool out as far as you can. Lay the drafted strips together. When you have several of these, pick them up and smooth them wide strip of wool between your hands and then draft it out gently into something resembling roving. See the following pistures that show 3 rovings made this way. I find this methed quicker and easier than 1.


Oh btw, I am now attempting to make a spinning wheel....... out of lolly sticks :D:D

Trying hashtags. Not had much success with them but here goes. #spinning #spindle #wool #spin

Monday 21 October 2013

Today I'm spinning with my home-made spindle
It's working fairly well, although the current bobbin is too large for optimum stability. I must get some bluetack; that may help.

I am currently attempting to improve my rolag making. Apparently rolags are really easy to make if you have carding combs. I do not have carding combs.
I found an interesting youtube video showing how to make a multicoloured rolag for making multi coloured wool.
Here is the video.

Doesn't she make it look easy?

I had a go and my first rolag fell apart as I picked it up. Rolag 2 fell apart as I tried to spin from it, but I managed to get it to hang together long enough. Rolag 3 is a bit better. Nowhere near as smooth as she made hers though.

The rolag is the bit that bears a striking resemblance to a large owl pellet! Now admittedly, my 'dowel' is a chopstick, and I broke her rule about not mixing fleece type, so maybe not so strange that it's a bit rough. Practice makes perfect, and just because someone on youtube says to not do something, doesn't mean that you need to listen. :D

Now I don't know if this will work, but I'm going to try adding those new tag things.
Here goes.
#spin
hmmm, that's a fail!

Sunday 20 October 2013

Success!
It's a bit wibbly wobbly but it works!


Here it is after twining  its first ball.
Bobbin removed to show the kebab of foam squares.


Spindle ready for spinning. Bobbin with twined wool, and the contraption that I made to make a ball that can be easily unwound from both ends. Inspired by my Turkish spindle, if I wind it correctly I can remove the chopsticks and tube and then twine straight from the ball.

Will quit here with this post as its formatting keeps going skewy!

Saturday 19 October 2013

I just made a drop spindle with removable bobbin....~is proud!
You know how it is, you always need more spindles than you have.
I have one with wool spun from bought roving, one that I'm using to spin straight from the fleece, but I need more multicoloured wool for my hat.

So I looked at a pack of chopsticks, remembered that I have a hook left from the kick spindle attempt, spotted a dvd, and with the aid of some cardboard and PVA glue knocked together a spindle.
So now the glue is drying, but I'm still thinking.

I have some foam sheets, and a tube that came out of a roll of paper.

So out come scissors.
Cut foam into cubes and then cut holes in the middle of the cubes. Thread cubes onto spindle like a kebab, and make sure that the corners of the squares are NOT lined up. Slide tube over them and 'voila'


It's not pretty, and until the glue dries I don't know how steadily it will spin. I have it propped up in a hole in the foam to try and keep the spindle and disc at the right angle but I won't know if it's worked until all the glue has dried.

Note, it is very hard to screw a hook into the end of a chopstick. The wood ended up splitting so I put a blob ofglue on there too.
The tube and foam cubes are not glued so can be removed easily.
I'm going out soon so the glue will have lots of time to dry. I may add a bit of wood to the end for a better washer than the one I made from cardboard.